 Tutorials - Design templates
In this tutorial we show how to create your own elements template design. For this, we will use Painters objects. If you just want to change style of elements (like image, color, size, font size, shadows, etc...) or use themes, please have a look the the examples section.
In order to keep the logical and graphical component well separated, ThorPy uses a specific family of objects to generate the graphical part of an element. This allow, for example, to use the so-called 'themes' and to change the style of the whole program by adding only one line to the code.
Before getting into the heart of the matter, you have to know that at a certain time, an element is into a certain state. For example, thorpy.Element instances have only one state by default, which is thorpy.constants.STATE_NORMAL, while thorpy.Pressable can in addition be in the state thorpy.constants.STATE_PRESSED. In fact, you are even free to define other states. The point is that to each state correspond a different image to draw ; when the element changes of state, this changes how it looks like. To a given state correspond a given Painter instance.
When you call the finish method of an element, you tell to this element that he can begin its graphical existence since you have specified all its graphical attributes. In fact, two things basically happens: first, the element call the Painters of all its states and tell them to produce the corresponding pygame surface.
Assignment of a painter to an element
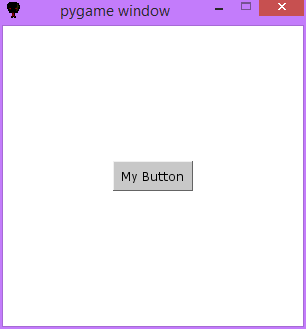
Let us write a basis code:
1 2 3 4 5 6 7 8 9 10 11 12 13 | import thorpy, pygame
application = thorpy.Application((300, 300))
my_button = thorpy.Clickable("My Button") #some test element
my_button.center()
background = thorpy.Background.make((255,255,255), elements=[my_button])
menu = thorpy.Menu(background)
menu.play()
application.quit()
|
Now, let's try to attribute a given painter to my_button. We do not necessarily need to write our own Painter ; ThorPy uses many pre-defined painters. For example, we can try thorpy.painters.roundrect.RoundRect painter. At line 5 we do that, giving the size, color and radius attributes of the painter, though we could as well let default arguments. Then at line 10 we specify the painter for the button.
1 2 3 4 5 6 7 8 9 10 11 12 13 14 15 16 17 18 19 | import thorpy, pygame
application = thorpy.Application((300, 300))
my_painter = thorpy.painters.roundrect.RoundRect(size=(100,50),
color=(55,255,55),
radius=0.3)
my_button = thorpy.Clickable("My Button") #we do not use 'make' !!!
my_button.set_painter(my_painter)
my_button.finish() #very important : don't forget to call finish()
my_button.center()
background = thorpy.Background.make((255,255,255), elements=[my_button])
menu = thorpy.Menu(background)
menu.play()
application.quit()
|

Note that on line 10, we implicetely set the painter for all states, this is to say thorpy.constants.STATE_NORMAL and thorpy.constants.STATE_PRESSED states. One way to be more precise is to give the painter for the desired state during instanciation, and to delete line 10 in the previous code. For example, if you want some painter only for pressed state, then line 9 in the previous code would be: my_button = thorpy.Clickable("My Button", press_params={"painter":my_painter}).
Creating your own painter
Let's invent our own Painter instance. The easiest and cleanest way to write a Painter is to create a class that inherits from thorpy.painters.painter.Painter. Then, we just have to redefine the method called get_surface so that it returns the surface we want for our Painter. Since this surface is drawn according to the attributes of the painter (i.e color, size, ...) you will in general also redefine the __init__ method so that you can initialize your painter with the desired attributes.
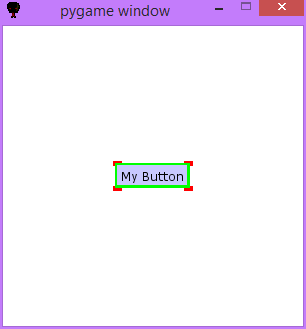
We should now define a style template that we want to implement with the Painter. Let's say we want that elements drawn with this template have a 'body' rect of a certain color, and then four small rects at each corner that extends beyond the edge of the body. The corner rects have another color than the body one. In addition, the border of the body rect has a third color. Finally, all that is not in any rect must not be drawn. Note that the corner rects are 'behind' the body.
The code below implements such a template design. First let's call 'c1' the corner color, 'c2' the body color and 'c3' the body border color. At line 6 we declare a class that inherits from the basis class for painters, so you only have to define get_surface method. At line 8, we define the constructor so that it accepts the three colors defining our design template.
Into get_surface method, at line 18 we first create the surface that will be returned - it is just a fully transparent rect for the moment. Then from lines 19 to 28, we simply implement the design discussed above. Finally, we set the clip rect of the surface at line 29 - in our case, its just the same as the surface's size so it does not change anything, but you may want to restrict it. For example, the classical design template set the clip 1 pixel smaller than the size, so when children elements of an element are drawn, they do not hide the border of their father element.
1 2 3 4 5 6 7 8 9 10 11 12 13 14 15 16 17 18 19 20 21 22 23 24 25 26 27 28 29 30 31 32 33 34 35 36 37 38 39 40 41 42 43 44 | import thorpy, pygame
application = thorpy.Application((300, 300))
#Inherits from the basis class thorpy.painters.painter.Painter
class MyPainter(thorpy.painters.painter.Painter):
def __init__(self,c1, c2, c3, size=None, clip=None, pressed=False,
hovered=False,):
#size, clip, pressed and hovered are present in ALL Painters
super(MyPainter, self).__init__(size, clip, pressed, hovered)
self.c1 = c1
self.c2 = c2
self.c3 = c3
def get_surface(self):
#transparent surface so that all that is not drawn is invisible
surface = pygame.Surface(self.size, flags=pygame.SRCALPHA).convert_alpha()
rect_corner = pygame.Rect(0, 0, self.size[0]//6, self.size[1]//6)
rect_body = surface.get_rect().inflate((-5,-5))
#draw the four corners:
for pos in [rect_body.topleft, rect_body.bottomleft,
rect_body.topright, rect_body.bottomright]:
rect_corner.center = pos
pygame.draw.rect(surface, self.c1, rect_corner)
pygame.draw.rect(surface, self.c2, rect_body) #draw body
#draw body border:
pygame.draw.rect(surface, self.c3, rect_body.inflate((-5,-5)))
surface.set_clip(self.clip) #don't forget to set clip
return surface
my_painter = MyPainter(c1=(255,0,0), c2=(0,255,0), c3=(200,200,255))
my_button = thorpy.Clickable("My Button") #do not use 'make' !
my_button.set_painter(my_painter)
my_button.finish() #don't forget to call finish!
my_button.center()
background = thorpy.Background.make((255,255,255), elements=[my_button])
background.finish()
menu = thorpy.Menu(background)
menu.play()
application.quit()
|
Let's refine the painter. Now we want that, at hover, the corner rects are no longer behind the body, but before. Moreover, when pressed, the corner rects take the color c3. All that is easily handled using the pressed and hovered attributes of the painter.
1 2 3 4 5 6 7 8 9 10 11 12 13 14 15 16 17 18 19 20 21 22 23 24 25 26 27 28 29 30 31 32 33 34 35 36 37 38 39 40 41 42 43 44 45 46 47 48 49 50 51 52 | import thorpy, pygame
application = thorpy.Application((300, 300))
class MyPainter(thorpy.painters.painter.Painter):
def __init__(self,c1, c2, c3, size=None, clip=None, pressed=False,
hovered=False,):
super(MyPainter, self).__init__(size, clip, pressed, hovered)
self.c1 = c1
self.c2 = c2
self.c3 = c3
def get_surface(self):
#transparent surface so that all that is not drawn is invisible
surface = pygame.Surface(self.size, flags=pygame.SRCALPHA).convert_alpha()
rect_corner = pygame.Rect(0, 0, self.size[0]//6, self.size[1]//6)
rect_body = surface.get_rect().inflate((-5,-5))
color_corner = self.c1 #this color will change accordin to the state
if self.pressed:
color_corner = self.c3
#draw the four corners:
if not self.hovered:
for pos in [rect_body.topleft, rect_body.bottomleft,
rect_body.topright, rect_body.bottomright]:
rect_corner.center = pos
pygame.draw.rect(surface, color_corner, rect_corner)
pygame.draw.rect(surface, self.c2, rect_body) #draw body
#draw body border:
pygame.draw.rect(surface, self.c3, rect_body.inflate((-5,-5)))
#redraw corner rects if hovered
if self.hovered:
for pos in [rect_body.topleft, rect_body.bottomleft,
rect_body.topright, rect_body.bottomright]:
rect_corner.center = pos
pygame.draw.rect(surface, color_corner, rect_corner)
surface.set_clip(self.clip) #don't forget to set clip
return surface
my_painter = MyPainter((255,0,0), (0,255,0), (200,200,255))
my_button = thorpy.Clickable("My Button") #don't use 'make' !
my_button.set_painter(my_painter)
my_button.finish() #don't forget to call 'finish()
my_button.center()
background = thorpy.Background.make((255,255,255), elements=[my_button])
background.finish()
menu = thorpy.Menu(background)
menu.play()
application.quit()
|